

![]()
The lens ordering workflow is divided in three steps: 1. Wearer & Presciptions, 2. Lens and 3. Customisation.
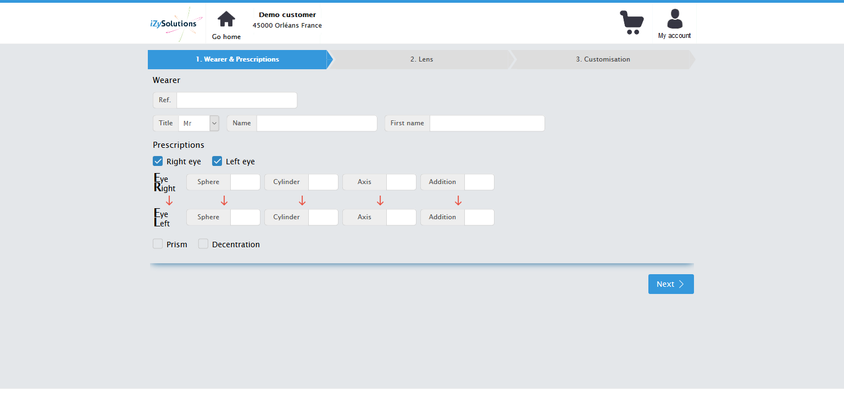
The home page of this section permits to opticians to enter all the information concerning the wearer and his prescriptions.
Step-by-step guide for Wearer & Prescription page
The procedure to complete this section is simple:
- Wearer part
- The first field is the optician reference. It is optional and helps the optician to retrieve his orders.
- Fields under are the wearer title, name and first name. Only the name is mandatory.
- Prescriptions part
- The optician can choose to order for both eyes or only one eye by checking/ unchecking right and left eye boxes.
- After entering prescriptions, you can access to the next textbox by pressing tabulation or enter to pass and duplicate the value to the left eye at the same time. Optician can also duplicate values by clicling on arrows.
- To enter prism and decentration the optician will check the according checkbox to display textboxes.


When all data has been entered, click on the Next button to access to the next part: LensThe lens ordering workflow is divided in three steps: 1. Wearer & Presciptions, 2. Lens and 3. Customisation.
Step-by-step guide
...

The Lens page is where the optician will be able to select lens and options he wants. Filters are available by using checkboxes and dropdown lists. They only display value that are available according to prescriptions entered before. For example, if no addition was entered then the dropdown list Type will only propose "Single vision".
Once the lens is selected all available options are displayed.

Options are grouped by type. Double click on an option on the available options to select it. To remove a selected option, double click on it.
When everything is done, click on Next will redirect you to the final section: Customisation.
Step-by-step guide for Customisation page

In Customisation page, you will be able to choose your order type (By diameter or Precal).
Select a Remote edging and enter Measurements.
- For order type By diameters, the diameter is selected via the Diameter dropdown list. Only available diameters according to lens and prescription are displayed.
- For order type Precal, a shape will be asked and all diameter related textboxes are hidden.

- Precal:
- Several options are available to add a shape:
- OMA file: choosing a file on the computer
- Standard shapes: choosing a shape and enter dimensions
- Tablet: draw the shape on a touch pad
- Remote edger: using a remote edger with iZyShape (only available if you have the iZyShape module)
- Loading a saved shape
- Several options are available to add a shape:


- If you select Breakthrough in Frame type, a new panel appears to place drill holes.

- If Remote edging is selected, the shape form is modified to add some specific information and disable options (Standard shape, Tablet input and the editing of Boxing dimension). On Remote Edging, the effective diameter is calculated and displayed under diameter textboxes. Any diameter under effective diameter is disable.


Step-by-step guide for Validation
:
If you think that your order is done, click on Complete my order. The validation of the order is launched. If any error is detected, a red message is displayed and textboxes are highlight in red.
...
If the order is validated, a summary is displayed with all information entered and three actions are possible:
- Add order to basket
...
- Edit order
...
- Delete order.
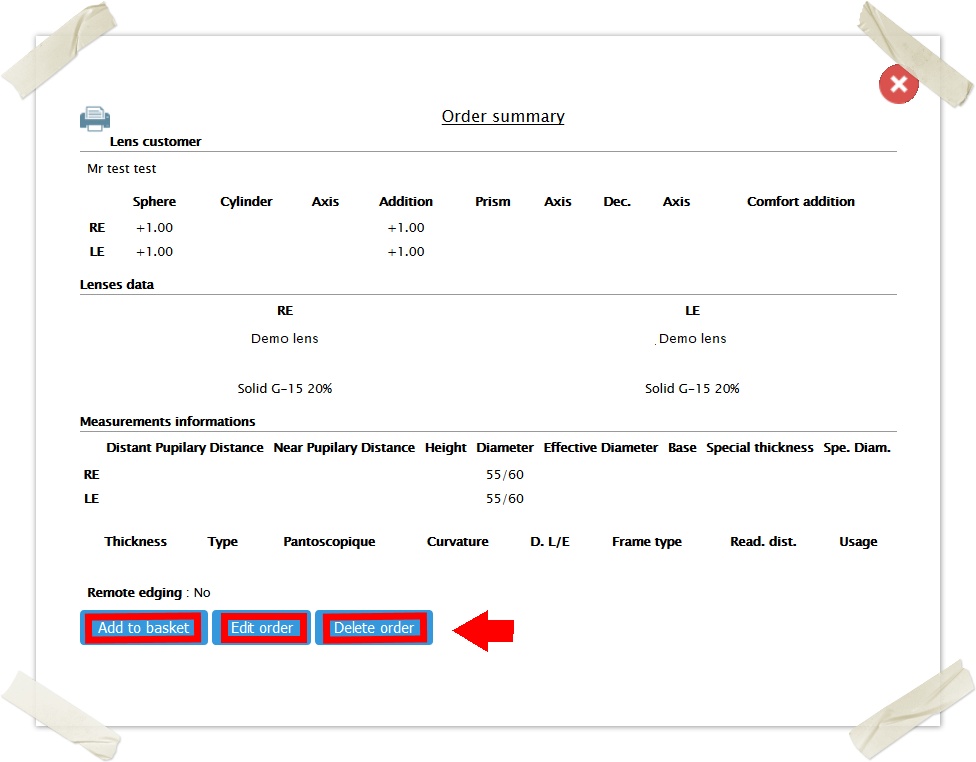
Clicking on Add to basket will add the order in your basket and asked what you want to do: Return to homepage, View my cart, Input second pair, Input new order.
...